I will show how to setup a basic network configuration inside FreeBSD. The first thing you need to do is to boot up your FreeBSD and log into the root account:
You may type ifconfig to display your current network configuration:
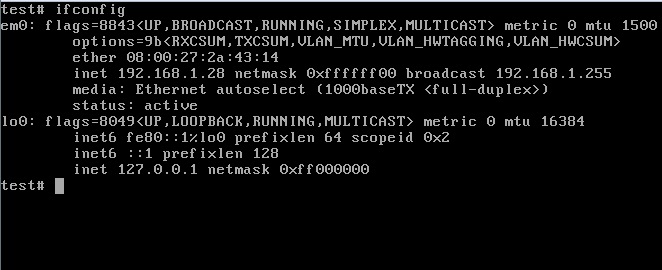
From the above picture, you can see that:
1) em0 – is your first network interface card inside your server
2) lo0 – the loopback interface to access your local services such as proxy or webserver http://127.0.0.1
Please take note that your network interface card might be vary depending on the manufacturer’s name.
The network card settings can be found edit here:
vi /etc/rc.conf
SETUP STATIC IP
You may type like below inside your interface configuration file:
hostname=”test.domain.com”
ifconfig_em0=”inet 192.168.1.24 netmask 255.255.255.0”
defaultrouter=”192.168.1.1”

Please take note that FreeBSD text control command line will be slightly different especially to delete words/characters. Press “dd” to delete the whole line or “x” to delete the character at the active cursor.
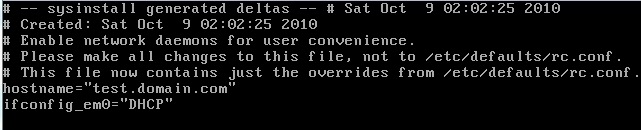
SETUP DHCP
In order to setup DHCP for the network interface card, just type like below inside the /etc/rc.conf file:
hostname=”test.domain.com”
ifconfig_em0=”DHCP”
CONFIGURE DNS
Next is to configure the DNS in order for it to resolve your domain name request into IP for the server to understand it. To configure, type:
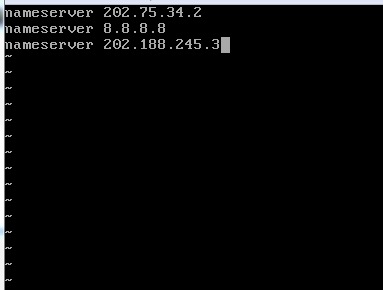
vi /etc/resolv.conf
Then you may add any DNS you want inside the file:
nameserver 202.75.34.2
nameserver 8.8.8.8
nameserver 202.188.245.3
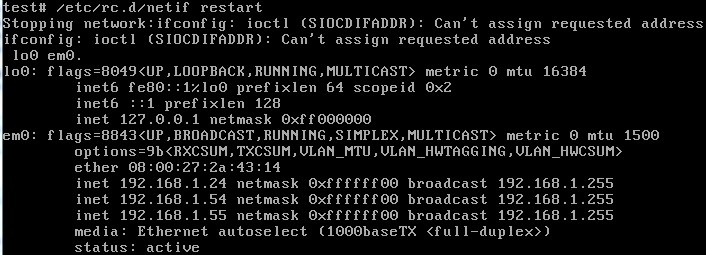
RESTART THE NETWORK SERVICE
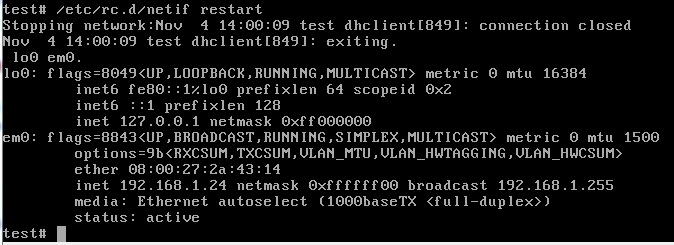
After finished editing any of the network setting, you need to restart the network service in order for new changes to take effect. To restart, type:
/etc/rc.d/netif restart
You may type ifconfig to see your new network settings:
You also may test ping a domain name to see whether your network settings is working or not by typing:
ping google.com

If you got the reply, this means your setup was successful.
ASSIGN MULTIPLE IP IN NETWORK INTERFACE CARD
The procedure would be the same like adding normal IP address to the network interface card. Just open up the network interface card settings by typing:
vi /etc/rc.conf
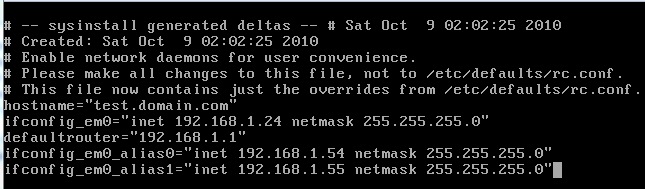
Then add these following lines (depending on how much additional IP you want to add):
hostname=”test.domain.com”
ifconfig_em0=”inet 192.168.1.24 netmask 255.255.255.0”
ifconfig_em0_alias0=”inet 192.168.1.54 netmask 255.255.255.0”
ifconfig_em0_alias1=”inet 192.168.1.55 netmask 255.255.255.0”
defaultrouter=”192.168.1.1”
After saving and restarting the network, you can check your new setting by typing ifconfig